


Shopify is the best platform to create a profitable ecommerce business website. You don't need to know how to code; you can create and customize a basic store by dragging and dropping the elements.
But when you need to add advanced functionality, like adding Shopify sub-collections, you need Shopify help from experts or learn how to guide.
So, In this guide, learn how to create Shopify sub collections for your Shopify store and optimize them for a better user experience.
Before creating Shopify sub collections, learn about what it is and why you should create this for your website.
What are Shopify sub collections?
Sub collections in Shopify are a grouping of products under a main collection, also known as sub categories.
You might have a primary collection for apparel and sub collections for different categories of apparel, like "bottoms," "bras & tops," and "jackets & coverups." Making your products even more broadly categorized enables you to make it simpler for buyers to find what they're looking for and enhance the user experience.
What are Categories vs Collections vs Subcategories vs Subcollections?
Categories and subcategories are the same as collections and subcollections; the only difference is when you refer to the Shopify categories called collections and subcategories called subcollections.
Collections relate to categorizing products in your Shopify store, which makes them different from using a link list.
While it is technically correct to refer to Shopify sub collections as subcategories, doing so is confusing.
Benefits of Creating Shopify Sub Collections
Compared to ecommerce sites without sub collections, a Shopify store with sub collections provides several advantages. The advantages of including sub collections in your Shopify store are listed below.
Better User Experience
Shopify sub collections improve navigation, which enhances the user experience. It greatly simplifies the purchasing process for users and helps them spend less time making wise decisions.
Increased Cross Sell
You can add additional goods or presents to complement direct or purchased items using Shopify sub-collections, which boosts cross-selling on your Shopify store and revenue simultaneously.
Improved SEO
Shopify sub collections improved your store's search engine optimization (SEO) by enhancing the website's Silo structure and increasing its exposure in search results. You may narrow your audience focus and raise conversion rates with subcollections.
Enhance Product Visibility
Subcollections in Shopify let you display more products on the home page. Buyers don't need to open pages to reach their desired products. It helps increase the visibility of products and can result in increased sales.
Dedicated Shopify sub collections versus product tag-based collection filtering
There are two basic ways to organize products in Shopify: using specific sub-collections and filtering collections using product tags.
Separate collections that are nested inside a parent collection are called dedicated sub-collections. Each sub-collection consists of products with specific characteristics, such as a similar color, size, or material. It allows you to exhibit things in a certain way and categorize them with ease.
Adding tags to each product and then utilizing those tags to filter the collection is how product tag collections are filtered. For instance, you can filter a collection using product tags based on size, color, or material. Multiple product categories are possible with it, making it simpler for buyers to find what they're looking for.
Your business's size, structure, and unique organizational requirements will ultimately determine whether you use dedicated sub-collections or filter collections using product tags.
How to Create Shopify Sub Collections?
The best way to create Shopify sub collections is to create them through the navigation. For this, you do not need to make any changes to the Shopify .liquid file and codes.
Create Shopify Sub Collections to The Navigation Menu
First step -
Log in to your Shopify store's admin panel.
Second step -
Click on "Navigation" in the left-hand menu under the “Online store”.

Third step -
Now. select the main menu by clicking on it. If you have not created the main menu yet, create it first by clicking on "Add Menu".

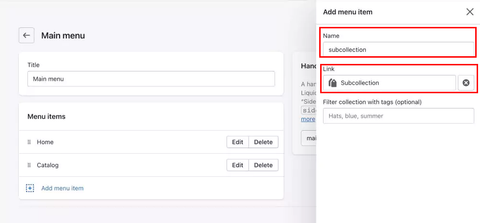
Fourth step -
Add the sub collection under the collection you want within the navigation. Give it a name and don’t forget to link the pre-created collection.
Fifth step -
Hover your mouse pointer over the "Dots" on the left side. Now drag the sub collection under the main collection in which you want to show.

Sixth step -
Now click on “Save Menu”.
By following the steps above, you can create the Shopify sub collection as much as possible.
Hire Shopify Expert to Create Shopify Sub Collections
At Ecomheroes, we offer Shopify website design and development services. You can also hire our Shopify expert to make any small change to your Shopify store.
Conclusion
After following this step-by-step guide, you can create Shopify sub collections without breaking any functionality or changing code files. If you still face problems doing this, contact us for a consultation; we are a leading Shopify website design and development company.