


Configurer l'expédition sur votre boutique Shopify est facile lorsque vous connaissez les tarifs d'expédition, la politique et les étapes pour ajouter l'expédition à votre boutique Shopify.
Si vous êtes propriétaire d'une boutique Shopify et que vous souhaitez configurer l'expédition sur votre boutique Shopify, lisez ce guide complet sur la façon de configurer l'expédition sur la boutique Shopify sans aucun tracas. C'est facile lorsque vous comprenez les zones d'expédition et les profils d'expédition de Shopify.
Après avoir lu ce guide, vous pourrez gérer l'expédition en fonction des zones d'expédition, des types de produits et des poids.
Comment configurer l'expédition sur Shopify ?
Pour configurer l'expédition sur Shopify, vous devez d'abord ajouter le lieu d'expédition pour les commandes expédiées depuis votre boutique Shopify. Suivez les étapes ci-dessous pour ajouter le lieu.
Ajouter un lieu d'expédition
Le lieu d'expédition est l'adresse d'où vos commandes sont expédiées. Par défaut, Shopify définit votre adresse commerciale lors de la création d'une boutique. Vous pouvez modifier manuellement l'adresse de la commande selon vos besoins.
Vous ne pouvez ajouter qu'un nombre limité de lieux à votre boutique Shopify, en fonction du plan Shopify que vous choisissez. Voici les restrictions de lieu.
- Shopify Lite – 3 lieux d'expédition
- Shopify Basic – 4 lieux d'expédition
- Shopify – 5 lieux d'expédition
- Shopify Advanced – 8 lieux d'expédition
- Shopify Plus – 20 lieux d'expédition
(NOTE : Si vous avez besoin de plus de 20 lieux d'expédition, contactez le responsable du support Shopify Plus.)
Pour ajouter ou modifier le lieu, suivez les étapes
- Connectez-vous au panneau d'administration de votre boutique Shopify.
- Cliquez sur l'onglet "Paramètres" dans le menu de gauche, puis cliquez sur l'option "Expédition".
- Dans la section Expédition, cliquez sur le bouton "Gérer les lieux".
- Dans la section Gérer les lieux, cliquez sur le bouton "Ajouter un lieu".

- Entrez le nom du lieu dans le champ "Nom" et sélectionnez le pays auquel le lieu appartient dans le champ "Pays".
- Dans la section "Adresse", entrez l'adresse complète du lieu, y compris la ville, l'état/province et le code postal.
- Enregistrez le nouveau lieu d'expédition en cliquant sur le bouton "Enregistrer le lieu".
Créer un profil d'expédition
La création d'un profil d'expédition est l'étape essentielle suivante pour ajouter l'expédition dans Shopify.
Pour créer un profil d'expédition, suivez les étapes ci-dessous
- Allez dans la section "Paramètres" et cliquez sur "Expédition".
- Sous la section "Profils d'expédition", cliquez sur "Créer un profil d'expédition".

- Donnez à votre profil d'expédition un nom descriptif et facilement reconnaissable, tel que "Expédition standard" ou "Expédition express".
- Dans la section "Tarifs", vous pouvez définir les tarifs d'expédition pour votre profil. Vous pouvez définir des tarifs forfaitaires, basés sur le poids ou en temps réel via une application d'expédition tierce.
- Si vous souhaitez ajouter des pays spécifiques au profil d'expédition, vous pouvez le faire sous la section "Expédition vers".
- Une fois que vous avez configuré vos tarifs d'expédition et vos destinations, cliquez sur "Enregistrer".
Une fois que vous avez configuré le profil d'expédition, configurez les zones d'expédition, suivez les étapes mentionnées ci-dessous.
Configurer les zones d'expédition
Les zones d'expédition sont des zones qui ont un tarif d'expédition commun. Si vous exercez votre activité au Royaume-Uni et que votre entrepôt est en France, vous devez configurer la zone d'expédition pour tous les pays du Royaume-Uni.
Étapes pour configurer les zones d'expédition
- Allez dans la section "Paramètres".
- Cliquez sur l'option "Expédition".
- Cliquez sur le bouton "Gérer les tarifs" sous la section "Zones d'expédition".

- Cliquez sur le bouton "Ajouter une zone d'expédition".
- Entrez un nom pour votre zone d'expédition, tel que "USA" ou "Europe".
- Sélectionnez les pays que vous souhaitez inclure dans la zone. Vous pouvez également ajouter des états ou des provinces spécifiques si vous le souhaitez.
- Enregistrez vos modifications.
L'étape suivante consiste à définir les tarifs d'expédition pour votre boutique Shopify.
Que sont les tarifs d'expédition Shopify ?
Les tarifs d'expédition sont le montant supplémentaire ajouté au prix du produit que vous facturez pour livrer les articles aux acheteurs. Shopify propose différents tarifs d'expédition, classés comme tarifs d'expédition forfaitaires, tarifs d'expédition gratuits, tarifs d'expédition calculés, tarifs de méthode de livraison locale et expérience client choisissant les tarifs d'expédition.
Discutons-en un par un.
Tarifs d'expédition forfaitaires
C'est l'option de facturer un client en fonction de la commande. Vous pouvez ajouter le tarif d'expédition comme vous le souhaitez, et il s'affichera au moment du paiement. Vous avez un contrôle total sur ce que vous voulez facturer.
Il est en outre classé en fonction de l'expédition régulière, du prix et du poids du produit.
Tarifs d'expédition gratuits
L'expédition gratuite signifie que vous ne facturez rien à l'acheteur pour tout produit. Pour configurer un tarif d'expédition gratuit, vous pouvez modifier le tarif forfaitaire à 0 $.
Tarif d'expédition calculé
Les transporteurs maritimes ou les applications d'expédition tierces que vous installez sur votre boutique Shopify fournissent le tarif d'expédition calculé. Ainsi, lorsqu'un acheteur effectue un achat, les transporteurs maritimes et les entreprises d'applications obtiennent les informations et vous indiquent ce que vous devriez facturer.
Ils tiennent compte des facteurs suivants pour calculer les frais d'expédition.
- Origine de l'expédition
- Destination de l'expédition
- Poids de l'envoi
- Valeur de l'envoi
- Dimensions de la boîte d'expédition
- Poids volumétrique
- Vitesse de livraison demandée.
Tarifs d'expédition locaux
Vous pouvez choisir les entreprises d'expédition locales si vos clients sont locaux. Vous pouvez définir le coût de livraison et le montant minimum de commande au moment du paiement dans cette méthode d'expédition.
Pour en savoir plus sur les tarifs d'expédition, lisez cet article de blog Shopify.
Guide étape par étape pour définir le tarif d'expédition
- Allez dans la section "Paramètres".
- Cliquez sur l'option "Expédition".
- Cliquez sur le bouton "Gérer les tarifs" sous la section "Zones d'expédition".

- Sélectionnez la zone d'expédition pour laquelle vous souhaitez définir les tarifs d'expédition.
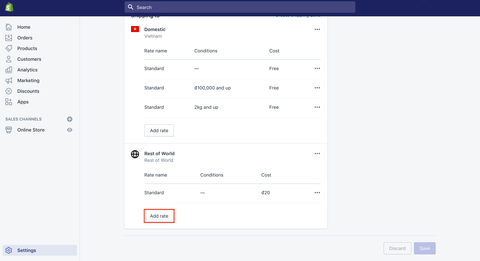
- Cliquez sur le bouton "Ajouter un tarif".
- Entrez un nom pour le tarif d'expédition, tel que "Expédition standard" ou "Expédition express".
- Choisissez comment vous souhaitez calculer le tarif d'expédition. Vous pouvez choisir de le baser sur le poids de la commande, le prix de la commande ou une combinaison des deux.
- Entrez le tarif pour l'option d'expédition. Par exemple, vous pouvez entrer un tarif forfaitaire de 5 $ pour l'expédition standard ou un tarif basé sur le poids de la commande.
- Enregistrez vos modifications.
Et voilà ! Vous avez maintenant configuré l'expédition pour votre boutique Shopify. Assurez-vous de réviser et de mettre à jour régulièrement vos profils d'expédition pour vous assurer d'offrir des options d'expédition compétitives et précises à vos clients.
Vous pouvez également lire : Comment configurer l'expédition USPS sur Shopify ?
Engagez des experts Shopify pour configurer l'expédition sur votre boutique Shopify
Vous pouvez engager un expert Shopify d'Ecomheroes pour configurer l'expédition sur votre boutique. Nos experts Shopify ont une vaste expérience dans la conception, le développement et la personnalisation de boutiques Shopify. Nos experts vous aident à configurer les tarifs d'expédition, les zones d'expédition et les remplacements de tarifs d'expédition qui répondent aux besoins de votre entreprise.