


Shopify is a cloud-based e-commerce website development platform where users can build even multichannel eCommerce stores or websites with the help of the Shopify cms platform. Users can create a highly professional and complete e-commerce website without writing a single line code. Building an ecommerce store is easy with Shopify themes, ready-to-use templates, apps, and add-ons.
You can start your own online business today with Shopify and earn money as quickly as your product gets promoted. To promote your products or services, you can start with different marketing channels like email marketing, content marketing, social media marketing, and search engine marketing.
To sell products you need to add products to your Shopify product pages. While adding products to the Shopify product page, you have to keep in mind that you are uploading the proper media(images or videos), meta fields, product description, specification, category, vendor name, tags, price, and type.
In this tutorial, we guide you on how to add products to Shopify that are ready to rank on search engines.
Step 1: Log Into Your Shopify Admin Panel
The first step is you need the login credential to log into your Shopify admin panel. For this, go to the Shopify website, click on the login button, and now fill in the login details to open your Shopify backend.

Now you are in the admin panel, click on the Products option on the left side menubar.

Click on the Add product button to add new products or services to your Shopify store.

A Shopify product page will open to fill in the product details like Title, Description, Media, Pricing, and more options as you can see in the image below.

Step 2: Add Product Details
Adding product details is your next step. Keep all product details in a document file to easily copy and paste them into respective product detail page fields.
Your product details page includes fields like:
- Title
- Description
Product title –
A product title is comprised of information about the product in short. For example, if you are selling smart watches for men, your precise title should be “Black strap smart wrist watch for men”.
Your title should be precise, specific, and engaging for the customers.
Benefits of optimized product titles –
- Enhance the engagement
- Influence buyers
- Convince users to open and look
- Boost search engine optimization
All products title should be optimized and up to the mark.
Product description –
Whereas the title is just the product name, the description is the detailed characterization of the products you are selling. It includes the product specifications(size, color, dimensions), benefits, and sometimes use cases. Write a product description focused on the targeted audience and search engine optimized ready.
Benefits of using user focused product description –
- Easy to convey product specifications to the audience
- Boost branding
- Improve search engine ranking
- Boost conversion rate
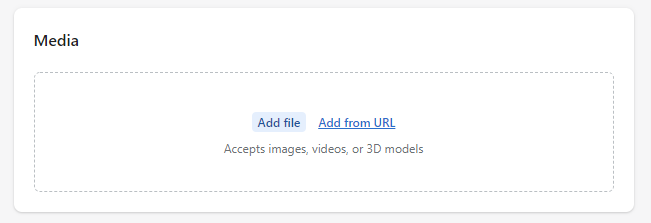
Step 3: Add Product Media
Once you have filled in complete product details, now it’s time to add the product’s media to your product page. Shopify allows you to add images, videos, and 3d models to the product page. Images are becoming an essential aspect of product description while you are selling products online.
There is no other way for an online buyer to get insight into products. Images or videos are the most convenient way to get a realistic view virtually.
Benefits of using product images and videos
- Grab buyers’ attention quickly
- Give customers a better idea of products
- Boost your brands
- Increase sales and decrease returns
- Increase likelihood
You can add media to the Shopify product page in two ways
Add file – You can upload product images or videos file in allowable format through this option from your desktop or local drive.
Add from URL – With this option, you can add product images or videos from the online space where your media already uploaded through URLs. For instance, you can upload videos from your YouTube channel.
Note: Don’t forget to add an Alt tag on your images it helps to boost the website’s overall SEO and user experience.
Step 4: Add Pricing, Inventory, and Shipping Details
Once, you have done the above steps. Now time to add pricing, inventory, and shipping details to your Shopify product page.
Pricing
In the pricing section, you can see the three fields.
- Price
- Compare at price
- Cost per item
Price – Price is the selling price of products or services to your customers. This price amount will reflect on your live store product page.

Compare at price – “Compare at price” is the price at which you compare the selling price of products. For example, it can be the maximum retail price(MRP) that tag on in-store products. Compare at price is always high to the selling price.
Cost per item – Cost per item is the price you are paying to the manufacturer. For example, if you resell a product at $20 and the manufacturer price is $5(excluding taxes, shipping, or other costs). You can enter $5 in the cost per item field. It’s not visible to the customers.
Inventory –
Inventory is your stocks of products. Under this section, you can see the following fields.
- SKU
- Barcode
- Quantity

SKU –
SKU is stock keeping unit. It is a combination of numbers and the alphabet. Each product in your store has a unique SKU code. With the help of SKU, you can track sold products.
Barcode –
Barcode is used to encrypt product details or data. Through a barcode scanner, you can see the whole product details. On the Shopify store product page, your barcode can be ISBN, UPC, GTIN, etc.
Quantity –
Quantity is the total number of products you have in stock. For example, you have 100 pairs of shoes in stock. You can add a 100 quantity field.
With all these fields, there are two check box options viz.
Track quantity – Check it to track quantity.
Continue selling when out of stock – You are selling services as products check this box.
Shipping
Under the shipping section, the first option you can see in the image below is “This is a physical product” to ensure you are selling goods and services. For now, we are talking about the ecommerce website selling physical goods so right check this option, and other fields will appear in front of you such as.
- Weight
- Custom Information

Weight –
As its name, this field is for filling the weight of the products that you are adding. Product weight can seem not important, but in reality, shipping and freight charges are calculated according to the weight of products or goods.
You can add product weight in lb, oz, kg, and g units. Different units allow retailers to add weight to their location or country.
Customs Information
Custom information allows custom authorities to use to calculate duties when shipping internationally. Under this section, you have to fill two fields.
- Country/ Region of origin – Most of the time you have to fill the country in which products are manufactured.
- HS Code – HS (Harmonized System) code is used to identify the traded products internationally. Customs authorities around the world use this code to identify the traded products. You can search or enter it manually. You ask for the code from the manufacturer.
Step 5: Optimize Product Page for SEO
The 5th step is to optimize product listing for search engine optimization. To edit the SEO setting click on the “Edit website SEO” as shown in the image.

Search engine optimization is a technique used to rank website pages in search engines like Google, Yahoo, Bing, etc. Most of the SEO settings are default in Shopify you can’t edit them. But on the product listing page, you will get the options to optimize products’ meta title, meta description, and product page URL, as shown in the image below.
Meta Title –
The meta title is the title of your product that appears on the search engine result pages. The ideal length of meta title is o to 70 characters mentioned by Shopify below the title field. You can write and add a title in this field.
The basic structure of writing a meta title is to add the main keyword with stock words and brand name.
Meta Description –
A meta description is an element that provides the summary of product details with keywords in it. The ideal length of meta description is between 150-170 characters according to most SEO experts. But Shopify allows up to 320 characters to write a precise product description.
Recommended meta description length is 150 to 170 characters. You can write the description in this field or copy and paste it if you have already written it in other documents.
Product Listing URL –
You can edit or customize the product listing URL in Shopify through the available field. The product URL should be a combination of key phrases. We suggest you write the product URL as short as you keep it.
Shopify allows you to edit the URL part only after some default structure. For instance, “www.domain-name.com/prodcuts/” can’t be changed you can only write after the default URL term.
Benefits of SEO Optimized Product Listing in Shopify
There are several benefits of SEO-optimized product listing on Shopify. We listed the main benefits below.
- Improve store branding
- Lowering the paid marketing cost
- Get unlimited organic traffic
- Boost sales on store
- Increase website profit
- Create lasting value
- Enhance user experience
Step 6: Add Product Type, Vendor, Collections, and Tags
Under the “Product organization” section, you can add product type, vendor, collections, and tags. This section helps you to manage the products on collections pages and according to vendor name if you have a multivendor Shopify store.
The product organization section has the following fields that we explore one by one.
- Type
- Vendor
- Collections
- Tags

Type –
In the type field, you can select the type of business by searching appropriate business type. If you don’t find your business in the dropdown list, add the custom business with the “Add custom type” option.
Vendor –
If you have a multivendor Shopify store, then you can select the vendor name that you want from the list. For a single vendor, select the only name available in this option.
Collection –
This collection option is a list of the collection page that you have already created. When you click on it, a list will appear as a dropdown. You can choose any of them or multiple collections pages to which you want to add your product.
Tags –
Tags are used to make product search easy on your Shopify store and enhance website SEO. You can add tags by typing in the given field and clicking to add option. We suggest you add LSI keywords or main keyword-related phrases as your tags to improve search engine optimization.
Step 7: Publish Your Product Page
You have done all the hard work so far now it’s time to publish your product listing so buyers can find and buy it.
To publish your product select the “Active” option under the Product status section, as shown in the image below, and then click on the “Save” button. The other option you can see is “Draft”
it can be used when you want to publish the product later. Select the draft option and save.

SALES CHANNELS AND APPS
Sales channels and app options you can use if you want to sell products on the social media platforms that you have connected to your Shopify store. By connecting the sales channel to the Shopify store, you can keep track of your products, orders, and customers in one place.
Conclusion: How to Add Products to Shopify
Adding products to Shopify is easy you just have to follow all the above steps. With these steps, you can add products in no time. This guide also helps you to add products that are search engine friendly and user friendly. If you still find some difficulties, you can contact us. Our Shopify expert helps you to add products or you can buy our predefined add products to Shopify task from our task catalog.
Enjoy the selling on Shopify!