If you want to start a dropshipping business in 2024. Then you are on the right path to success because the dropshipping market is growing so quickly, and it's expected to be a whopping 22.0 percent of retail sales worldwide by 2023 as stats published by Oberlo.
Shopify was the leading platform for dropshipping business in 2021 as per the Statista report. Shopify dropshipped almost 1.9 million products, followed by Oberlo with less than 33 thousand products in the year 2021.
So Shopify is the best platform to start a dropshipping business.
Now the question is:
How to dropship on Shopify?
Here are a few simple steps to start your dropshipping store immediately. A complete guide for you.
#1 Determine your niche
#2 Sign up for Shopify
#3 Find and install dropshipping apps
#4 Explore and add dropship products of your niche
#5 Setup and design your website
#6 Add store domain
#7 Integrate payment gateway
#8 Market your products
#1
Determine Your Niche -
Your success depends on how you determine the niche. Because if you choose the niche you neither know nor have an interest in it then it's become quite difficult to get success as soon as you think. So, we suggest you choose a niche of your interest more likely. Thus, you can promote it, talk about it, drive traffic, and generate sales easily.
For example: If you are a gym trainer by profession or fitness freak then you can choose the health and fitness niche. So, it's easy to find the products or items that you could sell.
Now the additional tips to finding the best products according to current market demand.
Keyword research:
It starts with finding the right keywords and listing down them. To find the right keywords, you can use keyword research tools like Google keyword planner, Ahref, Semrush, or Keywordtool.io. These tools provide advanced data such as monthly search volume, competition, and related keywords.
Find trending products:
You can find the trending products on Google Trends, where you can filter out the data according to months, locations, and categories. It's very important to be aware of the latest product trends, most selling items, and customer demand to increase the sales organically.

Decide the name of the store:
You have successfully listed out the products and keywords now it's time to think about the name of the store. Because when going to register to Shopify it will ask to fill in the store name.
#2
Sign up for Shopify -
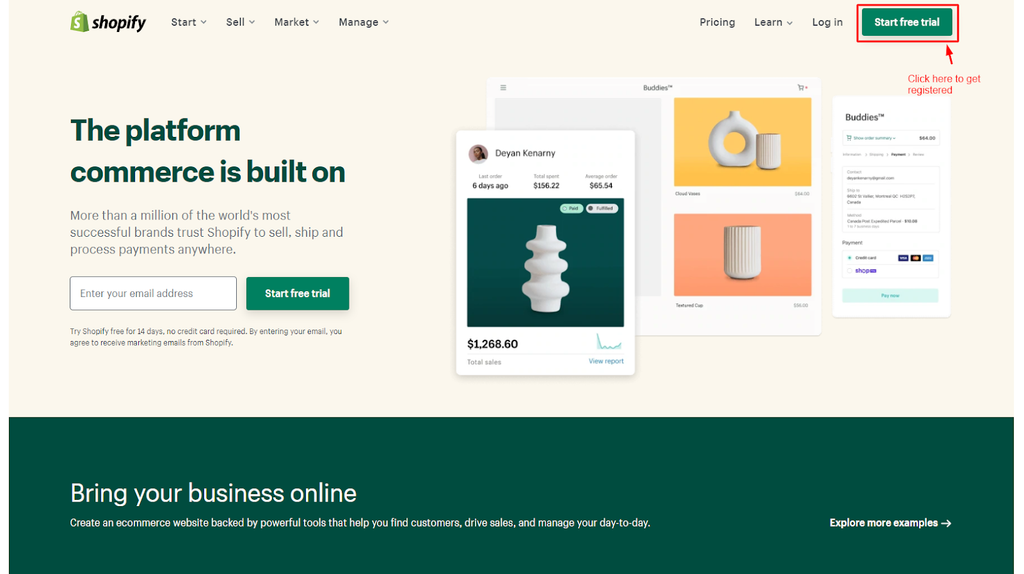
You already have decided the niche and chosen the product to sell. Now, time to start building your store by signing up for your Shopify account. For this, you have to go to the Shopify website and click on the button named "Start free trial" as shown in the image below:

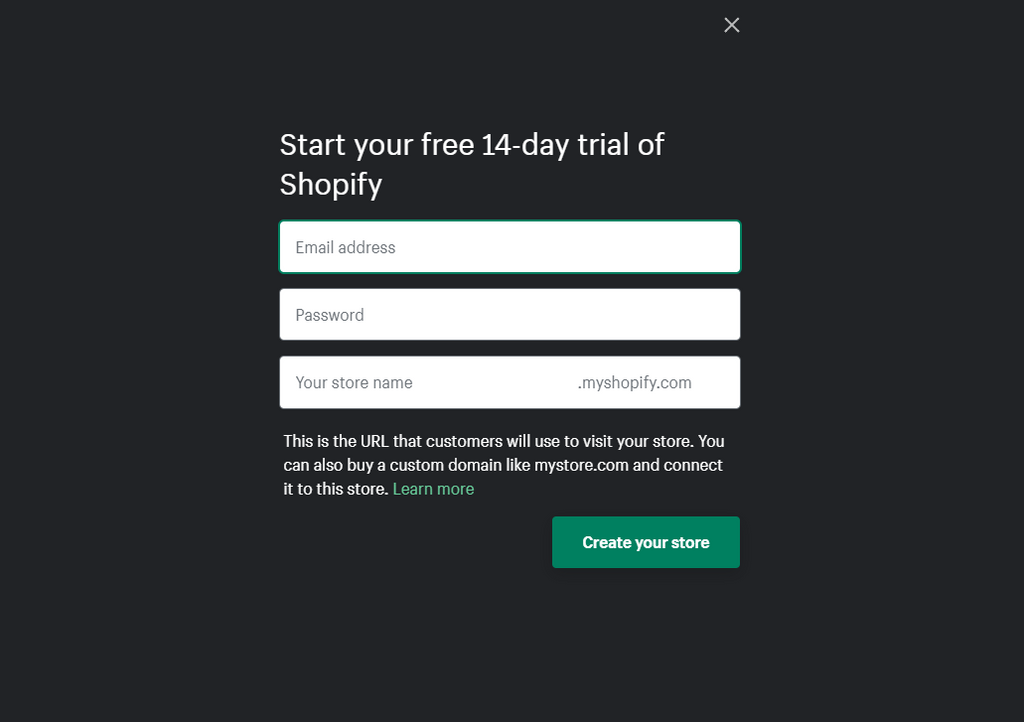
When you click on the button "Start free trial", immediately a screen will appear with the three fields named "Email address", "Password", and "Your store name" (as shown in the image below). You have to fill all three fields to get registered and to start the process of the store building.

From there, Shopify asks for a bit more information such as "Are you already selling?" and "What is your current revenue?" and "Are you setting up for client?"

After getting the registration process complete. Shopify sends an email with the store URL. Thus, you can go to the dashboard directly.
#3
Find and install dropshipping apps
Time to find the best dropshipping apps to install on your website. There are many dropshipping apps and some of the most installed apps are as follow:
- Oberlo ‑ Dropshipping App
- Spocket ‑ US & EU Dropshipping
- Printful: Print‑on‑Demand
- Printify: Print on Demand
- DSers: AliExpress Dropshipping Official Partner
- Aliexpress Dropshipping & More
- Modalyst ‑ Dropshipping
- teelaunch: Print on Demand
- Printy6 ‑ Print On Demand
- WC Fulfillment Print on Demand
Some of the dropshipping apps are niche-specific and others like Oberlo, Printful, Dsers, Printify, Spocket, etc. are multi-category apps with thousands of vendors and millions of products.
We suggest you install the Oberlo app because 100 million products have been sold through it successfully and this app is easy to install and made by Shopify itself.
Let's get a brief about the Oberlo:
Oberlo - Dropshipping app by Shopify is the best toolkit to begin and expand your dropshipping business free. You can start selling in just a few clicks such as:
Connecting or creating the store
- Finding products
- Adding them to your online store
- Ready to sell
Obrelo's key features:
- You can start with free
- Easy to find products
- Get the 24/7 customer support
- It's available in 6 languages
- Automatically update the price and inventory
- Real-time order tracking to know the status
- Important features like Affiliate marketing
- Highly secure and safe
- Thousands of vendors, and millions of products
#4
Explore and add dropship products of your niche
You have installed the dropshipping app. Now it's time to explore and add dropship products to your online store. Follow these steps to add get the best selling products:
1. Click on the "Product" option on the left-hand side of your dashboard.

2. Select "More actions" from the drop-down menu and click on the "Find more product to sell"

3. Now you will redirect to the Oberlo interface, where you can search products or vendors through the search bar field.

4. Hundreds of products appear within a second. You compare prices, designs, and other specific details and add them by clicking on the "Select product" button.

5. Selected products appear with the supply price and shipping cost along with a SET YOUR PRICE field in which you can enter your retail price. Now click on the "Add product" button, and Oberlo will automatically add the products to your Shopify website.

Similarly, you can add more products by repeating the 4th and 5th steps.
Note: You can edit and update product details like Product title, description, metadata, or tags through the Shopify backend panel under the products option.
You can also create collection pages to group all products according to category, product type, customer type, and more.
#5
Setup and design your website
You have done all the product upload work. Now, it's time to set up and design your store. To set up your store click on the "Store Online" on the sidebar of your backend panel. You can choose free themes or find premium themes available on the "Shopify Theme Store"

Customize the theme with Shopify tools
After you have chosen the theme, get started to customize it you can design or change the website look by edit and customizing sections or you can hire a Shopify expert who can design your store efficiently and professionally.
There are several tools to customize themes by utilizing them you can build highly converting pages. You can access these tools by going to Online Store > Themes > Customize for the theme you want to edit.
Create pages by going to Online Store > Pages > Add page and just create mandatory pages like About us, Terms and Policies, Contact Us, and Shipping & Return.
Set up navigation by going to Online Store > Navigation create menus and links so buyers can easily navigate through your website. This improves website credibility, search ranking, and enhances the user experience.
At the end set up your preference by going to Online Store > Preference option. Where you can write title and meta description, upload social sharing images, add google analytics and Facebook pixel, and do domain redirections.
#6
Add store domain
You have done so far successfully!
Ok great!
Now, this is time to add Domain to your Shopify store Domain can be set up in 3 ways:
- You can add the domain you already own
- You can buy a domain from Shopify
- You can transfer a domain
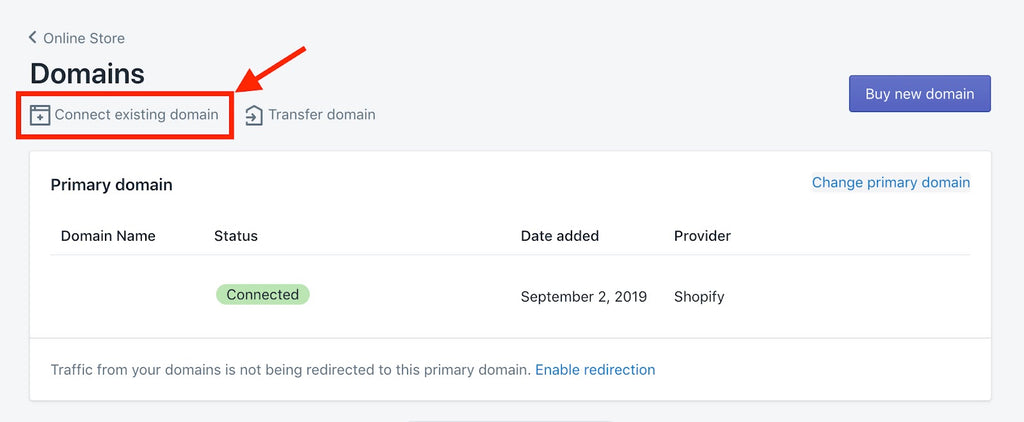
1. Here we explain how to add already own domain to your store. As we are already on our store backend, so click on the "Domains" option that appears under the "Store Online" section.

2. Click on the "Connect existing domain" option.

3. Now, enter the domain into the box field and click on next.

The domain is connected successfully, Shopify knows which domain you want to use.
Change DNS settings from your domain provider dashboard and point it to the Shopify server.
Now, all done!
Buy a domain from Shopify:
You can buy a domain from Shopify also if you want. Shopify gives the option of "Buy new domain" under the same domain setting.
Transfer domain:
You can also transfer your existing domain to Shopify. For this, you have to follow and ask the domain provider for the transfer process, and also check the Shopify guide.
#7
Integrate payment gateway
The next step is to set up the payment gateway. Here are the steps:
1. There is an option named "Settings" bottom of your Shopify sidebar bottom. Click on it and then click on the "Payment providers"

PayPal and Shopify payments are enabled by default and to connect other payment gateways or methods you can check the complete guide by Shopify.
Congrats! Your store is ready now.
#8
Market your products
You have done all the hard work. Now time to promote your products through the different marketing channels such as:
- Google Ads
- Facebook Ads
- Email Marketing
- Content Marketing
- Influencer Marketing
- SEO
You can start your marketing campaign by any of the marketing channels it depends on your budget. Google ads, Facebook ads, Email marketing, Influence marketing are quite expensive, so you go for SEO and Content marketing these are free you can do write blogs, and do SEO to get organic traffic on your website.
Conclusion:
Starting a dropshipping business with Shopify is very easy you can start a business in only 2-3 days without investing a big amount. There are millions of products, tools, and vendors that make your dropshipping business journey successful.
We are hoping that you have launched a dropshipping business without any problem but if you are still not able to do so. You can get a free consultation from our Shopify expert developers from EcomHeroes or you can check out the Shopify Dropshipping Store Design task made to help you.


